EN


How to Inspect LED Modules and Control Panels in Surgical Lights
For a biomedical engineering team, an operating lamp inspection is not simply a brightness check. A surgical light is part of the operating-room environment, so a reliable inspection connects light output, mechanical positioning, user controls, cleaning condition, and the escalation path when a fault appears. This article outlines a non-invasive routine for an LED surgical operating light. It does not replace the manufacturer’s instructions for use, service manual, local safety procedure, or qualified electrical service.
Start with safety, identity, and inspection boundaries
Before testing an operating lamp, record the room, asset ID, model, serial number, inspection date, and the person completing the check. Confirm that the light is available for inspection, that the surgical area is clear, and that the team understands whether the test is a pre-use check or planned maintenance. If a task requires opening a housing, measuring live electrical circuits, changing a module, or accessing a service menu, stop and follow the manufacturer-approved procedure or involve qualified service personnel.
IEC 60601-2-41:2021 addresses the basic safety and essential performance of surgical luminaires and luminaires for diagnosis. That reference does not create a universal field checklist; the applicable version of the manufacturer documentation and local requirements should define the acceptance criteria for the particular operating lamp.
Use a simple inspection sequence
Working from the outside inward prevents a small observation from becoming an uncontrolled repair attempt. For each operating lamp, use the same sequence: prepare, inspect visually, position the light, check the LED output, test the controls, document the result, and escalate when needed.
- Prepare: verify the unit identity and correct cleaning status.
- Observe: look for damage, contamination, loose covers, unusual noise, or warning indicators.
- Position: move the light through its normal permitted range and assess stability.
- Operate: test illumination and approved user controls without bypassing safeguards.
- Record: compare the observation with the previous service record and document exceptions.
That order is useful for a ceiling mounted operating light because arm balance, cable routing, and control response can affect whether an apparent LED problem is actually a positioning or power-path problem.
Inspect the LED module without opening the light head
Begin with the light switched off where the approved procedure requires it. Inspect the lens, protective cover, handle interface, seams, and visible fasteners for cracks, haze, discoloration, fluid ingress, or cleaning residue. Do not use a damaged cover or altered sealing surface as a cosmetic-only finding; record it and follow the facility’s escalation process.
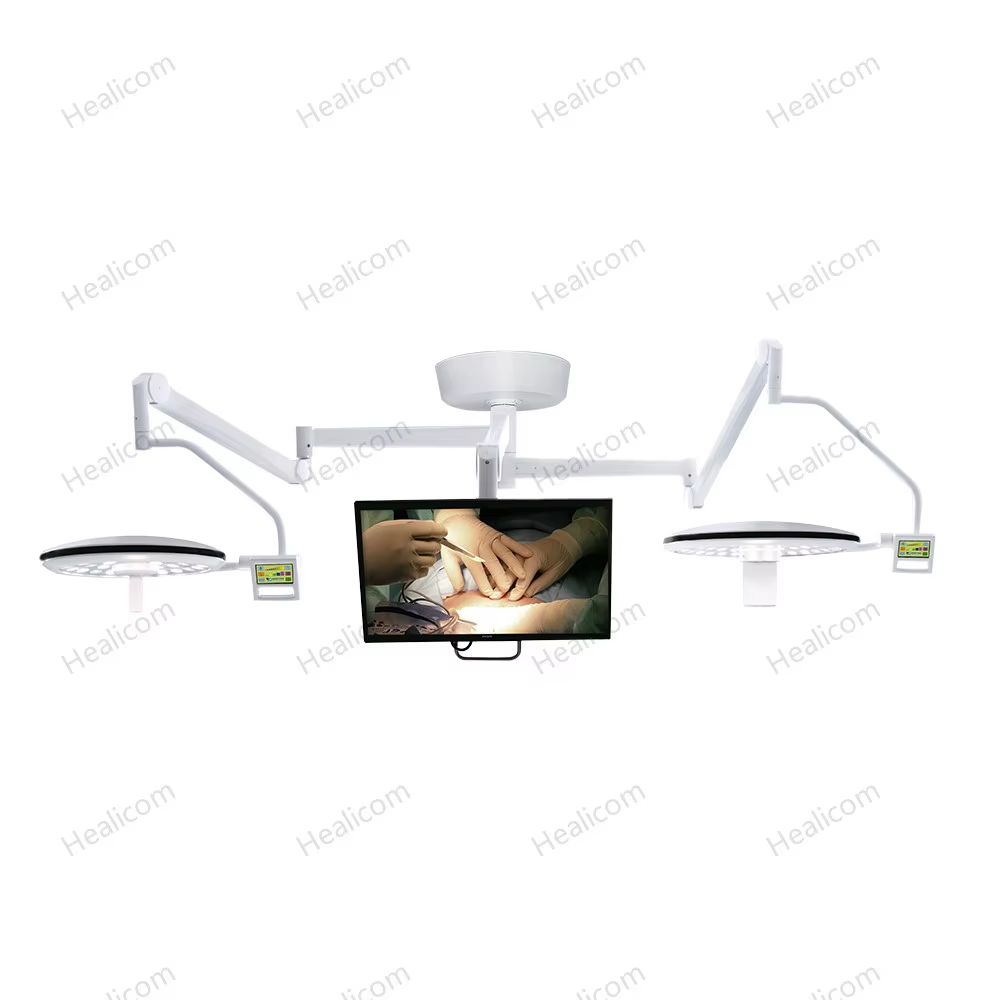
With the operating lamp energized under normal operating conditions, assess the illuminated field rather than staring directly into the LEDs. Look for a noticeably dark sector, flicker, delayed start, intermittent output during normal positioning, unexpected color variation, or an uneven pattern at the usual working distance. Compare the observation with the manufacturer-specified test method and a known-good baseline where the facility has one. More LEDs do not automatically mean a better field; the relevant question is whether the delivered light remains consistent and usable for the intended task.
For a surgical led light, do not diagnose a failed LED module solely from a single visual observation. Check whether the symptom changes with a permitted brightness setting, a different control station, or a documented power reset. If the symptom remains, note the indicator status and remove the unit from service only according to local procedure. Enclosure access, connector checks, and module replacement belong to trained personnel using the correct service documentation.
Check movement and heat-related warning signs
Move the operating lamp through the positions normally used in the room. The arm should travel smoothly within its approved range and should not drift after being positioned. Observe for rubbing, cable strain, unusual resistance, vibration, or a light head that cannot hold its intended orientation. A preventive-maintenance routine may include checking axis travel and position stability, but adjustment of brakes, springs, or internal mechanisms should follow the manufacturer’s specified process.
After the approved warm-up period, look for unusual odor, abnormal fan behavior where applicable, a thermal warning, or a housing condition that conflicts with the unit’s normal behavior. Do not judge temperature by touch unless the manufacturer explicitly permits that method. Record the duration, brightness setting, control used, and room condition so the service team has context rather than a vague report of “too hot.”
Test the control panel by function, not by appearance
A clean, responsive panel is important, but the inspection should prove each approved function. For the local panel and any authorized wall or remote control, test the functions documented for that model:
- power on and power off response;
- brightness increase and decrease across the permitted range;
- mode selection, such as an approved endoscopy or low-light mode, when fitted;
- display readability, button response, and status or fault indicators;
- expected response when switching between authorized control points.
Test one change at a time and allow the operating lamp to respond before issuing the next command. If a control panel is slow, inconsistent, unresponsive, or shows an unfamiliar code, photograph the display if local policy allows, record the exact sequence, and consult the model-specific guide. Avoid repeated rapid cycling, hidden menus, or a presumed reset sequence that is not authorized in the documentation.
Separate operator findings from service findings
| Observation | Appropriate first action | Do not do |
|---|---|---|
| Lens cover is hazy, cracked, or contaminated | Follow approved cleaning or remove-from-service procedure and document the condition. | Use unapproved solvents or disassemble the light head. |
| Uneven field, flicker, or a dark sector | Repeat the approved functional check, record settings and indicators, then escalate. | Assume an LED module is failed and replace it without authorization. |
| Light head drifts or arm movement is abnormal | Record the position and symptom; request service review. | Adjust internal springs, brakes, or fasteners without procedure approval. |
| Buttons or display respond inconsistently | Document the exact control sequence and fault message, if shown. | Enter service menus or reset configuration without authorization. |
This separation matters because an operating-room team needs a clear decision: can the operating lamp remain in use under local policy, does it require a scheduled service visit, or must it be taken out of service now? The inspection record supports that decision; it should not overstate a diagnosis.
Document results so the next inspection is more useful
A short but structured record is more valuable than a pass/fail mark alone. Include the asset ID, test date, brightness or mode tested, observed field quality, panel response, arm stability, indicator status, cleaning or cover condition, action taken, and any work-order reference. Over time, repeated notes about a particular control key, intermittent flicker, or position drift make it easier to distinguish an isolated event from a developing fault.
When evaluating an LED surgical operating light, the strongest practice is to keep the inspection practical and bounded: verify what the user can safely observe, compare it against approved criteria, and move electrical, enclosure, and calibration work to the responsible service pathway. The same approach applies to a surgical led light used frequently in busy rooms: consistent checks reduce surprises, while disciplined escalation avoids creating a new safety issue during troubleshooting.
Final checklist for each operating lamp
- Confirm unit identity and approved inspection status.
- Inspect visible covers, handles, seals, and mounting condition.
- Check smooth movement and stable positioning within the approved range.
- Assess field uniformity, start-up behavior, and visible warning signs.
- Test permitted brightness, mode, and control-panel functions.
- Record exact symptoms, settings, indicators, and follow-up action.
- Escalate anything beyond the user-level inspection boundary.
For a ceiling mounted operating light, this routine helps the facility connect everyday observations to a defensible service record. Review the manufacturer’s latest instructions before changing a checklist, because component layout, permitted controls, and required tests differ by model.
 Hot News